In a virtual machine
Installing YunoHost in a VirtualBox is usually intended for testing or development. It is not convenient to run an actual server on the long-term, because the machine it's installed on probably won't be up 24/7, and because Virtualbox adds an additional layer of complexity in exposing the machine to the Internet.
Pre-requisites
- An x86 computer with VirtualBox installed and enough RAM capacity to be able to run a small virtual machine with 1024MB RAM and 8GB capacity (at least)
Download the YunoHost image
If your host OS is 32 bits, be sure to download the 32-bit image.
If you wish to check the validity of our signed images, you can download our public key.
Create a new virtual machine

It's okay if you can only have 32-bit versions, just be sure that you downloaded the 32-bit image previously.
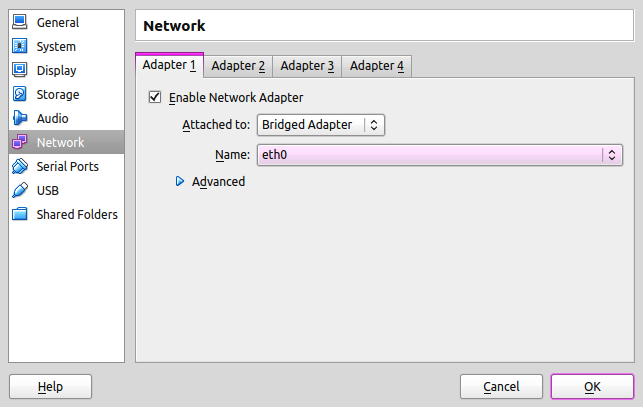
Tweak network settings
This step is important to properly expose the virtual machine on the network
Go to Settings > Network:
- Select
Bridged adapter - Select your interface's name: wlan0 if you are connected wirelessly, or eth0 otherwise.
Boot up the virtual machine
Start the virtual machine after selecting the YunoHost image.
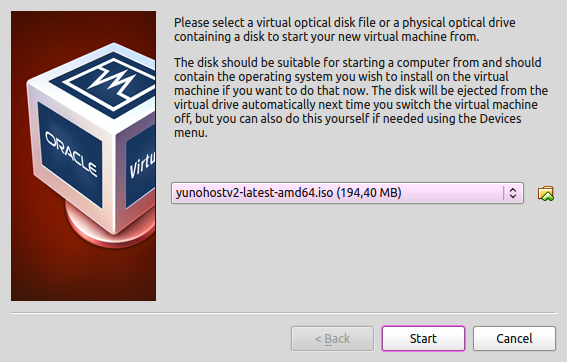
If you encounter the error "VT-x is not available", you probably need to enable Virtualization in the BIOS of your computer.
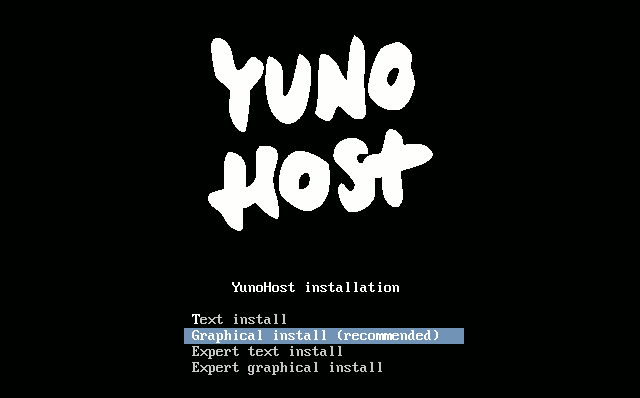
Launch the graphical install
You should see a screen like this:
- Classic installation on a whole disk
- Installation in expert mode
Once you have validated the keyboard layout, the installation will be launched and will completely erase the data on your hard disk!
- Select
Graphical install - Select your language, your location, your keyboard layout, and eventually your timezone.
- The installer will then download and install all required packages.
The YunoHost project simplified the classic installation as much as possible in order to avoid as many people as possible being lost with questions that are too technical or related to specific cases.
With the expert mode installation, you have more possibilities, especially concerning the exact partitioning of your storage media. You can also decide to use the classic mode and add your disks afterwards.
Summary of the steps in expert mode
- Select
Expert graphical install. - Select your language, location, keyboard layout and possibly your timezone.
- Partition your disks. This is where you can set up a RAID or encrypt all or part of the server.
- Specify a possible HTTP proxy to use for the installation of the packages
- Specify on which volumes grub should be installed
Regarding partitioning
In general, we recommend against partitioning /var, /opt, /usr, /bin, /etc, /lib, /tmp and /root on separate partitions. This will prevent you from having to worry about full partitions that could crash your machine, cause app installations to fail, or even corrupt your databases.
For performance reasons, it is recommended to mount your fastest storage (SSD) on the root /.
If you have one or more hard drives to store data, you can choose to mount it on one of these folders depending on your usage.
| Path | Contents |
|---|---|
/home | User folders accessible via SFTP |
/home/yunohost.backup/archives | YunoHost backups to be placed ideally elsewhere than on the disks that manage the data |
/home/yunohost.app | Heavy data from YunoHost applications (nextcloud, matrix...) |
/home/yunohost.multimedia | Heavy data shared between several applications |
/var/mail | User mail |
If you want flexibility and don't want to (re)size partitions, you can also choose to mount on /mnt/hdd and follow this tutorial to mount all these folders with mount --bind.
About encryption
Be aware that if you encrypt all or part of your disks, you will have to type the passphrase every time you restart your server, which can be a problem if you are not on site. There are however solutions (quite difficult to implement) that allow you to type the passphrase via SSH or via a web page (search for "dropbear encrypted disk").
About RAID
Keep in mind that:
- the disks in your RAIDs must be of different brands, wear and tear or batches (especially if they are SSDs)
- a RAID 1 (even without a spare) is more reliable than a RAID 5 from a probability point of view
- hardware raids are dependent on the raid card, if the card fails you will need a replacement to read and rebuild the array
If the YunoHost installer fails and you can't solve the issue, know that it's also possible to install Debian and then install YunoHost on top. See these instructions.
Now that YunoHost is installed, you can now go through the initial post-install configuration.