On a regular computer
Pre-requisites
- A x86-compatible hardware dedicated to YunoHost with at least 512MB of RAM and 16GB of disk
- this may be an old laptop, desktop computer, or a proper server machine
- A 1GB+ USB key
- A reasonable ISP, preferably with good and unlimited upstream bandwidth
- An ethernet cable (RJ-45) to connect your server to your router.
- A computer to read this guide, flash the image and access your server.
Download the YunoHost image
If your machine is 32 bits, be sure to download the 32-bit image.
(FIXME: this bit is currently broken...)
Optionally, you can download the project's public key to check the authenticity of the images.
Flash the YunoHost image
Flash the image on the USB key or CD/DVD.
- With Etcher (recommended)
- With USBimager
- With dd
- Using Ventoy
Download Etcher for your operating system and install it.
Plug your USB key, select your image and click "Flash"

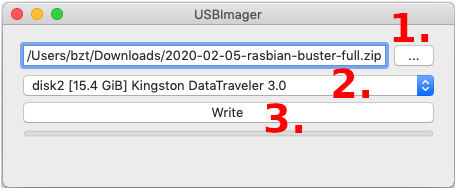
Download USBimager for your operating system and install it.
Plug your USB key, select your image and click "Write"
If you are on GNU/Linux / macOS and know your way around command line, you may also flash your USB stick or SD card with dd. You can identify which device corresponds to your USB stick or SD card with fdisk -l or lsblk. A typical SD card name is something like /dev/mmcblk0. BE CAREFUL and make sure you got the right name.
Then run:
# Replace /dev/mmcblk0 if the name of your device is different...
dd if=/path/to/armbian.img of=/dev/mmcblk0 status=progress ; sync
Ventoy will be useful if you can't sucessfully boot the YunoHost image using the other methods.
Ventoy is a nice tool that makes it really easy to put multiple linux images on a USB stick. When the computer refuses to boot from an image on a USB stick, Ventoy will usually be able to boot it anyway!
- Install Ventoy on the USB stick. Refer to the install instructions.
- This will create 2 partitions on the stick.
- Using your favorite file explorer app, copy the YunoHost image file on the big
Ventoypartition (not "VTOYEFI")- Don't use Balena Etcher, USBImager or
ddfor this!
- Don't use Balena Etcher, USBImager or
Later, when you'll boot the computer using this USB stick, Ventoy will appear and will list the images on the USB stick. Select the YunoHost image, then select GRUB2 launch option (or use whichever works for your computer 😉)
Boot the machine on your USB stick
- Connect your computer to your home router via Ethernet
- Boot up your server with the USB stick or a CD-ROM inserted, and select it as bootable device.
- Depending on your hardware, you will need to press one of the following keys:
<F9>,<F10>,<F11>,<F12>,<DEL>,<ESC>or<Alt>. - N.B. : if the server was previously installed with a recent version of Windows (8+), you first need to tell Windows, to "actually reboot". This can be done somewhere in "Advanced startup options".
- Depending on your hardware, you will need to press one of the following keys:
If you can't boot the YunoHost image, try using Ventoy (select "Ventoy" in the section "Flash the YunoHost image" above).
Launch the graphical install
You should see a screen like this:
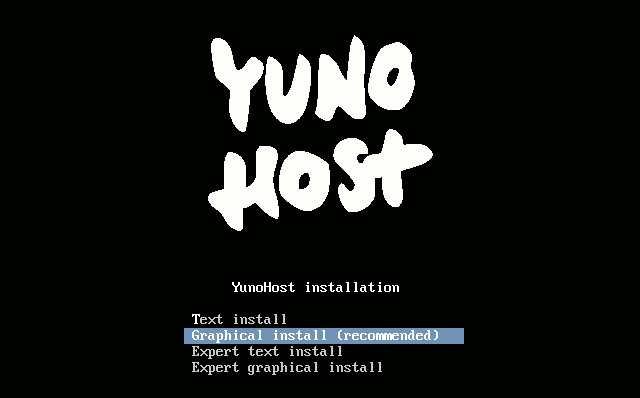
- Classic installation on a whole disk
- Installation in expert mode
Once you have validated the keyboard layout, the installation will be launched and will completely erase the data on your hard disk!
- Select
Graphical install - Select your language, your location, your keyboard layout, and eventually your timezone.
- The installer will then download and install all required packages.
The YunoHost project simplified the classic installation as much as possible in order to avoid as many people as possible being lost with questions that are too technical or related to specific cases.
With the expert mode installation, you have more possibilities, especially concerning the exact partitioning of your storage media. You can also decide to use the classic mode and add your disks afterwards.
Summary of the steps in expert mode
- Select
Expert graphical install. - Select your language, location, keyboard layout and possibly your timezone.
- Partition your disks. This is where you can set up a RAID or encrypt all or part of the server.
- Specify a possible HTTP proxy to use for the installation of the packages
- Specify on which volumes grub should be installed
Regarding partitioning
In general, we recommend against partitioning /var, /opt, /usr, /bin, /etc, /lib, /tmp and /root on separate partitions. This will prevent you from having to worry about full partitions that could crash your machine, cause app installations to fail, or even corrupt your databases.
For performance reasons, it is recommended to mount your fastest storage (SSD) on the root /.
If you have one or more hard drives to store data, you can choose to mount it on one of these folders depending on your usage.
| Path | Contents |
|---|---|
/home | User folders accessible via SFTP |
/home/yunohost.backup/archives | YunoHost backups to be placed ideally elsewhere than on the disks that manage the data |
/home/yunohost.app | Heavy data from YunoHost applications (nextcloud, matrix...) |
/home/yunohost.multimedia | Heavy data shared between several applications |
/var/mail | User mail |
If you want flexibility and don't want to (re)size partitions, you can also choose to mount on /mnt/hdd and follow this tutorial to mount all these folders with mount --bind.
About encryption
Be aware that if you encrypt all or part of your disks, you will have to type the passphrase every time you restart your server, which can be a problem if you are not on site. There are however solutions (quite difficult to implement) that allow you to type the passphrase via SSH or via a web page (search for "dropbear encrypted disk").
About RAID
Keep in mind that:
- the disks in your RAIDs must be of different brands, wear and tear or batches (especially if they are SSDs)
- a RAID 1 (even without a spare) is more reliable than a RAID 5 from a probability point of view
- hardware raids are dependent on the raid card, if the card fails you will need a replacement to read and rebuild the array
If the YunoHost installer fails and you can't solve the issue, know that it's also possible to install Debian and then install YunoHost on top. See the specific instructions.
Proceed with the initial configuration
If you are in the process of restoring a server using a YunoHost backup, you should skip this step and instead restore the backup instead of the postinstall step.
This documentation assumes you're on the same local network as your YunoHost installation.
For a VPS, please use the public IP address instead of the local domain or address.
- From the web interface
- From the command line
On a computer, open a browser and try to reach the webadmin:
- if you're installing on a VPS, you probably used the
curl | bashinstall method, and it should have pointed you with the address, typicallyhttps://xx.xx.xx.xx(with the public IPv4 of your server) - if you're installing at home, and assuming that you are on the same local network as the server
- you can try to open https://yunohost.local (this may or may not work depending if your computer and network supports the Bonjour protocol)
- if you already know the local IP of the machine, go to
https://xx.xx.xx.xx(with the local IP, typically starting with192.168.) - otherwise you will need to find out its local IP before continuing.
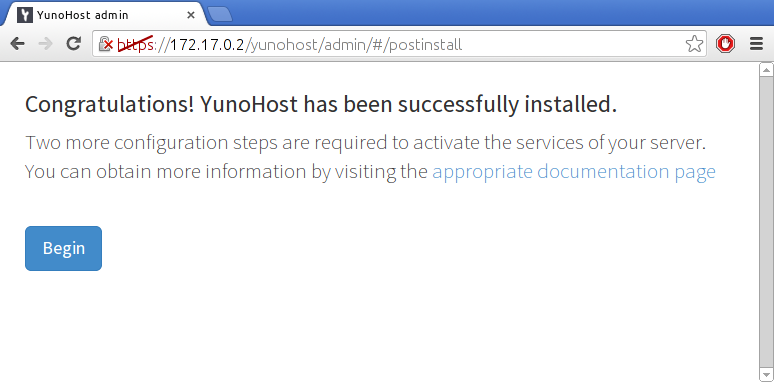
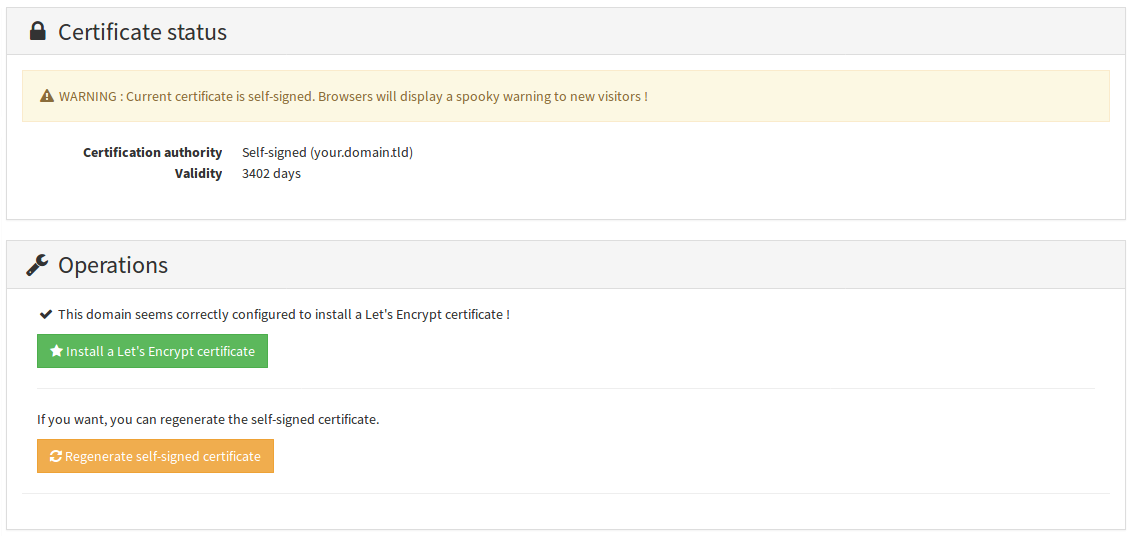
During the first visit, you will very likely encounter a security warning related to the certificate used by the server. For now, your server uses a self-signed certificate. You will later be able to add a certificate automatically recognized by web browsers as described in the certificate documentation. For now, you should add a security exception to accept the current certificate. (Though, PLEASE, do not take the habit of blindly accepting this kind of security alert!)
You should then land on this page:
You can also perform the postinstallation with the command yunohost tools postinstall directly on the server, or via SSH.
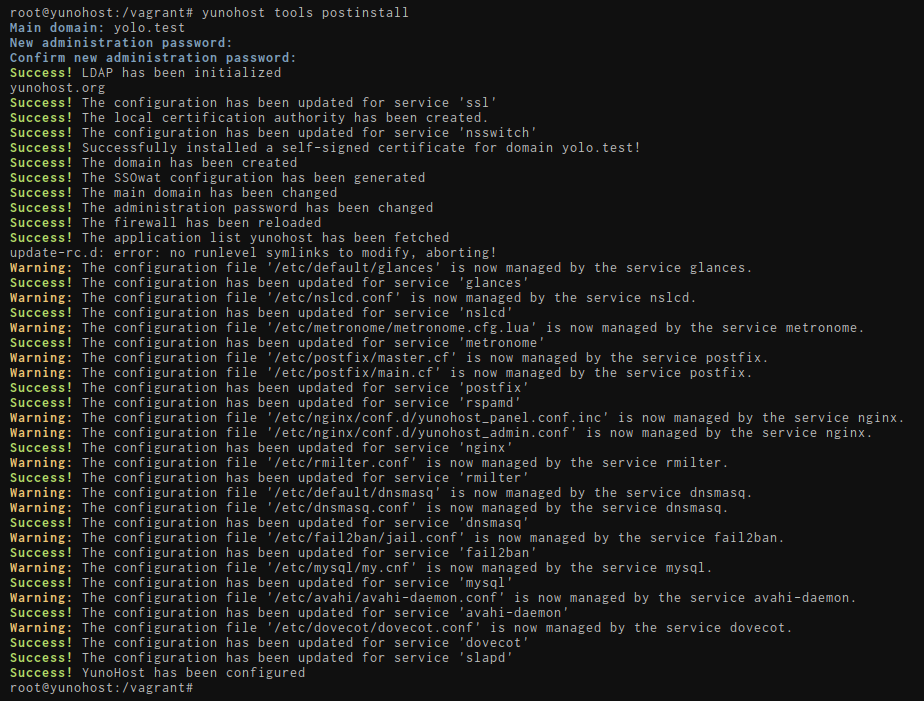
Main domain
WSL specific configuration
You will have to choose a fake domain, since it will not be accessible from outside.
For example, ynh.wsl. The tricky part is advertising this domain to your host.
Alter your C:\Windows\System32\drivers\etc\hosts file. You should have a line starting by ::1, update it or add it if needed to get:
::1 ynh.wsl localhost
If you want to create subdomains, do not forget to add them in the hosts file too:
::1 ynh.wsl subdomain.ynh.wsl localhost
This will be the domain used by your server's users to access the authentication portal. You can later add other domains, and change which one is the main domain if needed.
- If you're new to self-hosting and do not already have a domain name, we recommend using a .nohost.me / .noho.st / .ynh.fr (e.g.
homersimpson.nohost.me). Provided that it's not already taken, the domain will be configured automatically and you won't need any further configuration step. Please note that the downside is that you won't have full-control over the DNS configuration. - If you already own a domain name, you probably want to use it here. You will later need to configure DNS records as explained here.
Yes, you have to configure a domain name. If you don't have any domain name and don't want a .nohost.me / .noho.st / .ynh.fr either, you can set up a dummy domain such as yolo.test and tweak your local /etc/hosts file such that this dummy domain points to the appropriate IP, as explained here.
First user
The first user is now created at this stage. You should pick a username and a reasonably complex password. (We cannot stress enough that the password should be robust!) This user will be added to the Admins group, and will therefore be able to access the user portal, the web admin interface, and connect via SSH or SFTP. Admins will also receive emails sent to root@yourdomain.tld and admin@yourdomain.tld: these emails may be used to send technical information or alerts. You can later add additional users, which you can also add to the Admins group.
This user replaces the old admin user, which some old documentation page may still refer to. In which case: just replace admin with your username.
Run the initial diagnosis
Once the postinstall is done, you should be able to actually log in the web admin interface using the credentials of the first user you just created.
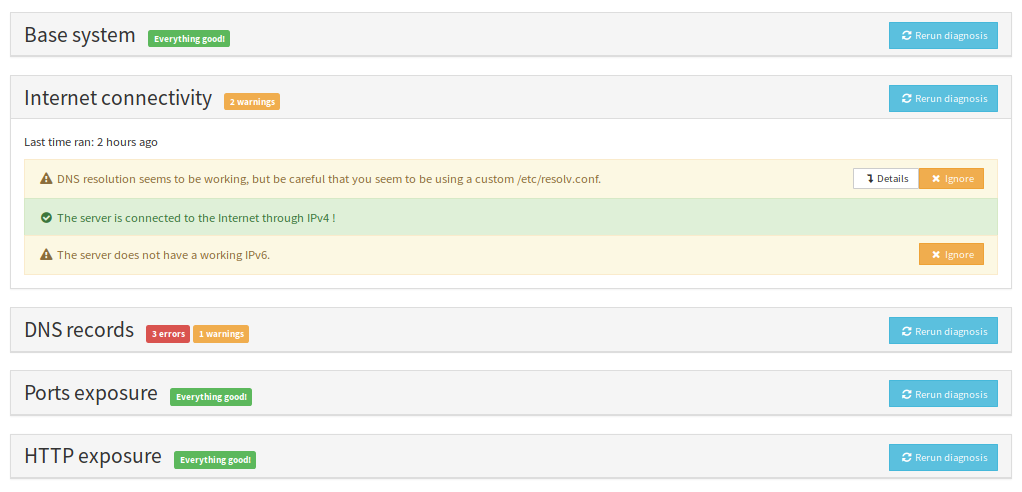
The diagnosis system is meant to provide an easy way to validate that all critical aspects of your server are properly configured - and guide you in how to fix issues. The diagnosis will run twice a day and send an alert by email if issues are detected.
Don't run away ! The first time you run the diagnosis, it is quite expected to see a bunch of yellow/red alerts because you typically need to configure DNS records (if not using a .nohost.me/noho.st/ynh.fr domain), as well as port forwarding on your home's router.
If an alert is not relevant (for example because you don't intend on using a specific feature), it is perfectly fine to flag the issue as 'ignored' by going in the webadmin > Diagnosis, and clicking the ignore button for this specifc issue.
Especially, installations on WSL or virtual machines will likely not be reachable from outside without further network configuration on Virtualbox and your machine.
- (Recommended) From the web interface
- From the command line
To run a diagnosis, go on Web Admin in the Diagnosis section. Click Run initial diagnosis and you should get a screen like this:
yunohost diagnosis run
yunohost diagnosis show --issues --human-readable
Get a Let's Encrypt certificate
Once you configured DNS records and port forwarding (if needed), you should be able to install a Let's Encrypt certificate. This will get rid of the spooky security warning from earlier for new visitors.
For more detailed instructions, or to lean more about SSL/TLS certificates, see the corresponding page here.
- From the web interface
- From the command line
Go in Domains > Click on your domain > Certificate
yunohost domain cert install
🎉 Congratz!
You now have a pretty well configured server. If you're new to YunoHost, we recommend having a look at the guided tour. You should also be able to install your favourite applications. Don't forget to plan backups !