On a regular computer
Requerimentos
- A x86-compatible hardware dedicated to YunoHost with at least 512MB of RAM and 16GB of disk
- this may be an old laptop, desktop computer, or a proper server machine
- A 1GB+ USB key
- A reasonable ISP, preferably with good and unlimited upstream bandwidth
- An ethernet cable (RJ-45) to connect your server to your router.
- A computer to read this guide, flash the image and access your server.
Descarga a imaxe YunoHost
If your machine is 32 bits, be sure to download the 32-bit image.
(PRECISA ARRANXO: esta parte está estragada a día de hoxe...)
De xeito optativo, podes descargar a clave pública do proxecto para comprobar a autenticidade das imaxes.
Flash the YunoHost image
Flash the image on the USB key or CD/DVD.
- Con Etcher (recomendado)
- con USBimager
- con dd
- Using Ventoy
Descarga Etcher para o teu sistema operativo e instálaa.
Plug your USB key, select your image and click "Flash"

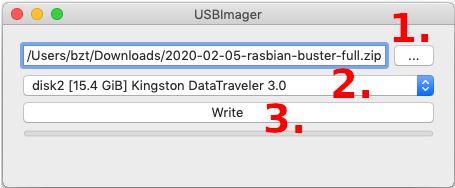
Descarga USBimager para o teu sistema operativo e instálaa.
Plug your USB key, select your image and click "Write"
Se utilizas GNU/Linux / macOS e estás habituada a usar a liña de ordes, podes gravar a tarxeta SD ou memoria USB con dd. Podes identificar o dispositivo USB ou tarxeta SD con f-disk -l ou lsblk. O nome típico para as tarxetas SD é algo como /dev/mmcblk0. PON COIDADO e comproba que seleccionas o nome correcto.
Despois executa:
# Replace /dev/mmcblk0 if the name of your device is different...
dd if=/path/to/armbian.img of=/dev/mmcblk0 status=progress ; sync
Ventoy will be useful if you can't sucessfully boot the YunoHost image using the other methods.
Ventoy is a nice tool that makes it really easy to put multiple linux images on a USB stick. When the computer refuses to boot from an image on a USB stick, Ventoy will usually be able to boot it anyway!
- Install Ventoy on the USB stick. Refer to the install instructions.
- This will create 2 partitions on the stick.
- Using your favorite file explorer app, copy the YunoHost image file on the big
Ventoypartition (not "VTOYEFI")- Don't use Balena Etcher, USBImager or
ddfor this!
- Don't use Balena Etcher, USBImager or
Later, when you'll boot the computer using this USB stick, Ventoy will appear and will list the images on the USB stick. Select the YunoHost image, then select GRUB2 launch option (or use whichever works for your computer 😉)
Boot the machine on your USB stick
- Connect your computer to your home router via Ethernet
- Boot up your server with the USB stick or a CD-ROM inserted, and select it as bootable device.
- Depending on your hardware, you will need to press one of the following keys:
<F9>,<F10>,<F11>,<F12>,<DEL>,<ESC>or<Alt>. - N.B. : if the server was previously installed with a recent version of Windows (8+), you first need to tell Windows, to "actually reboot". This can be done somewhere in "Advanced startup options".
- Depending on your hardware, you will need to press one of the following keys:
If you can't boot the YunoHost image, try using Ventoy (select "Ventoy" in the section "Flash the YunoHost image" above).
Launch the graphical install
You should see a screen like this:

- Classic installation on a whole disk
- Installation in expert mode
Once you have validated the keyboard layout, the installation will be launched and will completely erase the data on your hard disk!
- Select
Graphical install - Select your language, your location, your keyboard layout, and eventually your timezone.
- The installer will then download and install all required packages.
The YunoHost project simplified the classic installation as much as possible in order to avoid as many people as possible being lost with questions that are too technical or related to specific cases.
With the expert mode installation, you have more possibilities, especially concerning the exact partitioning of your storage media. You can also decide to use the classic mode and add your disks afterwards.
Summary of the steps in expert mode
- Select
Expert graphical install. - Select your language, location, keyboard layout and possibly your timezone.
- Partition your disks. This is where you can set up a RAID or encrypt all or part of the server.
- Specify a possible HTTP proxy to use for the installation of the packages
- Specify on which volumes grub should be installed
Regarding partitioning
In general, we recommend against partitioning /var, /opt, /usr, /bin, /etc, /lib, /tmp and /root on separate partitions. This will prevent you from having to worry about full partitions that could crash your machine, cause app installations to fail, or even corrupt your databases.
For performance reasons, it is recommended to mount your fastest storage (SSD) on the root /.
If you have one or more hard drives to store data, you can choose to mount it on one of these folders depending on your usage.
| Path | Contents |
|---|---|
/home | User folders accessible via SFTP |
/home/yunohost.backup/archives | YunoHost backups to be placed ideally elsewhere than on the disks that manage the data |
/home/yunohost.app | Heavy data from YunoHost applications (nextcloud, matrix...) |
/home/yunohost.multimedia | Heavy data shared between several applications |
/var/mail | User mail |
If you want flexibility and don't want to (re)size partitions, you can also choose to mount on /mnt/hdd and follow this tutorial to mount all these folders with mount --bind.
About encryption
Be aware that if you encrypt all or part of your disks, you will have to type the passphrase every time you restart your server, which can be a problem if you are not on site. There are however solutions (quite difficult to implement) that allow you to type the passphrase via SSH or via a web page (search for "dropbear encrypted disk").
About RAID
Keep in mind that:
- the disks in your RAIDs must be of different brands, wear and tear or batches (especially if they are SSDs)
- a RAID 1 (even without a spare) is more reliable than a RAID 5 from a probability point of view
- hardware raids are dependent on the raid card, if the card fails you will need a replacement to read and rebuild the array
If the YunoHost installer fails and you can't solve the issue, know that it's also possible to install Debian and then install YunoHost on top. See the specific instructions.
Comezar coa configuración inicial
Se estás restablecendo un servidor usando unha copia de apoio YunoHost, debes omitir este paso e restablecer a copia no lugar do paso da post-instalación.
Esta documentación asume que estás na mesma rede local que o servidor YunoHost.
Para un VPS, utiliza o enderezo IP público en lugar do dominio ou enderezo locais.
- desde a interface web
- desde a liña de ordes
Nunha computadora, abre o navegador e intenta acadar a interface web:
- se estás instalando nun VPS, probablemente usaches o instalador
curl | bashe debería informarte sobre o enderezo, normalmentehttps://xx.xx.xx.xx(co enderezo IPv4 público do teu servidor) - se estás instalando na casa, e supoñendo que estás na mesma rede local que o servidor
- podes intentar abrir https://yunohost.local (que igual non é accesible dependendo de se a túa computadora e rede son compatibles co protocolo Bonjour)
- se coñeces o enderezo IP local da máquina, vai a
https://xx.xx.xx.xx(co enderezo IP local, que normalmente comeza por192.168.) - tamén podes intentar o seu enderezo IP local antes de continuar
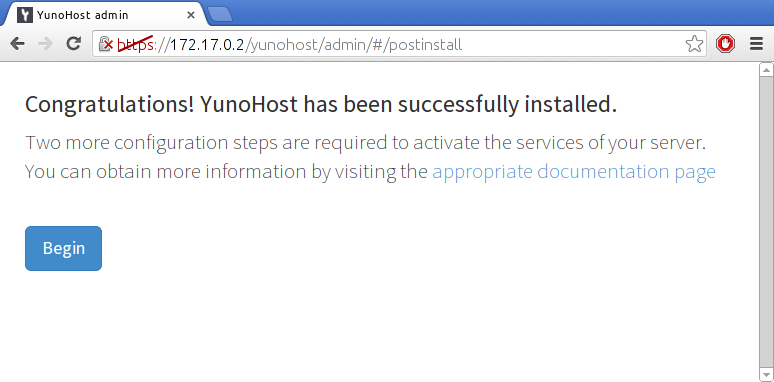
Na primeira visita probablemente recibas un aviso de seguridade informando sobre o certificado que utiliza o servidor. Polo de agora o teu servidor utiliza un certificado auto-asinado. Máis adiante poderás engadir un certificado que recoñezan automaticamente os navegadores, tal como se describe na documentación sobre certificados. Polo momento, tes que engadir unha excepción de seguridade para aceptar o certificado actual. (POR FAVOR, non fagas isto de xeito habitual, non aceptes sen pensar este tipo de advertencias!)
E entón deberías ver esta páxina:
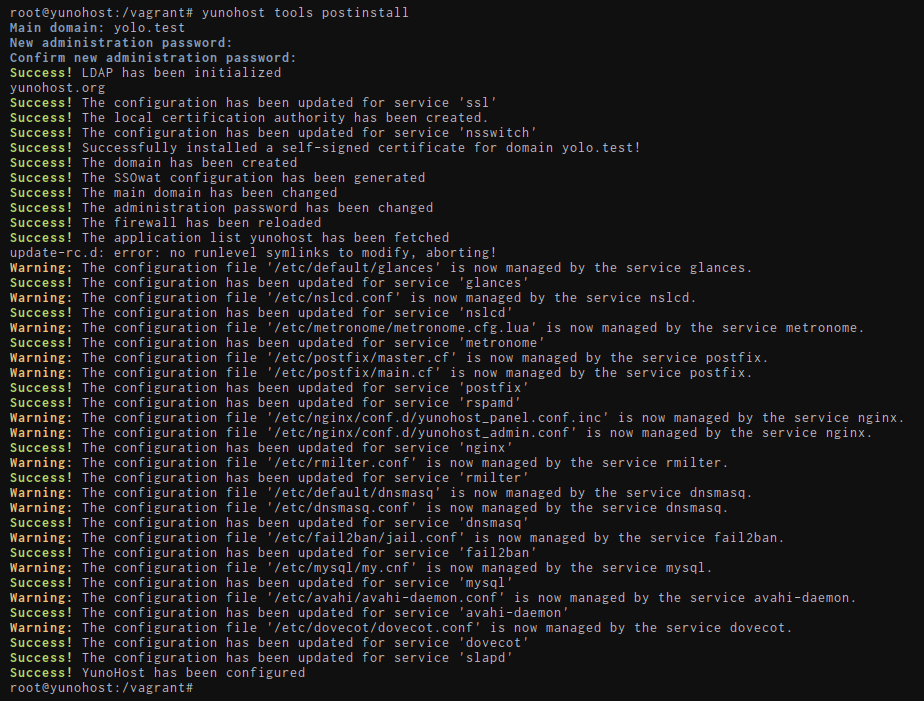
Tamén podes realizar a post-instalación coa orde yunohost tools postinstall directamente no servidor, ou vía SSH.
Dominio principal
Configuración WSL específica
Vas ter que escoller un dominio falso, que non será accesible desde o exterior.
Por exemplo, ynh.wsl. A parte complicada é comunicarlle este dominio ao teu ordenador.
Edita o teu ficheiro C:\Windows\System32\drivers\etc\hosts. Deberías ver unha liña que comeza por ::1, actualízaa ou engádea se fose preciso para ter:
::1 ynh.wsl localhost
Se queres crear subdominios, non esquezas engadilos tamén no ficheiro hosts:
::1 ynh.wsl subdomain.ynh.wsl localhost
Este vai ser o dominio que usen as túas usuarias para acceder ao servidor no portal de autenticación. Posteriormente poderás engadir outros dominios, e cambiar o dominio que queres usar como dominio principal.
- Se non tes experiencia coa auto-hospedaxe e aínda non posúes un nome de dominio, recomendamos utilizar un de .nohost.me* / .noho.st / .ynh.fr (ex.
miropereira.nohost.me). Dando por feito que non estea xa en uso por outra persoa, o domino configurarase de xeito automático e non precisarás facer ningún outro paso. Ten en conta que non terás control completo sobre a configuración DNS. - Se xa posúes un nome de dominio, probablemente queiras utilizalo aquí. Máis tarde poderás configurar os rexistros DNS tal como se explica aquí.
Si, tes que configurar un nome de dominio. Se non posúes ningún nome de dominio e tampouco queres un de .nohost.me / .noho.st / .ynh.fr , podes poñer un dominio de pega como yolo.test e modificar o teu ficheiro local /etc/hostspara que este dominio falso apunte ao enderezo IP axeitado, tal como se indica aquí.
Primeira usuaria
A primeira usuaria créase neste paso. Debes escoller un nome de usuaria (identificador) e un contrasinal razoablemente complexo. (Permítenos subliñar a importancia de que o contrasinal sexa forte!) Esta usuaria será engadida ao grupo de Administración, e terá acceso ao portal de usuaria, á interface web de administración, e poderá conectarse vía SSH ou SFTP. As contas Administradoras recibirán os correos enviados a root@yourdomain.tld e admin@yourdomain.tld: estes correo poden utilizarse para enviar información técnica ou alertas. Podes engadir máis tarde outras usuarias, que tamén poderás engadir ao grupo de Administración.
Esta usuaria substitúe á antiga usuaria admin, que podería aparecer referida nalgunha páxina antiga na documentación. Nese caso, substitúe adminco teu nome de usuaria.
Diagnóstico inicial
Unha vez remata a post-instalación, deberías poder acceder á interface web de administración usando as credenciais da primeira usuaria que creaches.
O sistema de diagnóstico procura ofrecerche un xeito doado para comprobar que varios compoñentes importantes do teu servidor están correctamente configurados - e axudarche a solucionar posibles incidencias. O diagnóstico realízase dúas veces ao día e envía una alerta por correo se detecta incidencias.
Non fuxas!! A primeira vez que se realiza o diagnóstico cabe agardar que aparezan avisos amarelos/vermellos porque normalmente é preciso configurar os rexistros DNS (se non usas .nohost.me/noho.st/ynh.fr domain) e tamén a redireccións de portos no encamiñador da casa.
Se unha alerta non é relevante (por exemplo porque non vas usar unha característica concreta) é perfectamente axeitado marcar a incidencia como 'ignorada' indo á Web de administración > Diagnóstico, e premer no botón ignorar para este asunto en concreto.
Especialmente, en instalacións WSL ou máquinas virtuais é probable que non sexan accesibles desde o exterior se non está configurada a rede en Virtualbox e na túa máquina.
- (Recomendado) desde a interface web
- desde a liña de ordes
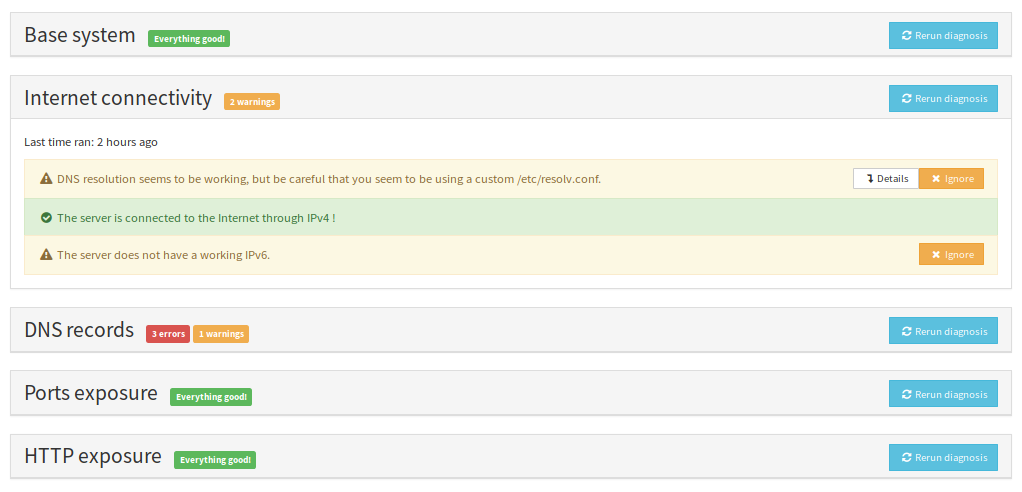
Para realizar o diagnóstico, vai á Web de Administración e á sección Diagnóstico. Preme en Realizar o diagnóstico inicial e deberías ver unha pantalla coma esta:
yunohost diagnosis run
yunohost diagnosis show --issues --human-readable
Obter un Certificado Let's Encrypt
Unha vez están configurados os rexistros DNS e a redirección de portos (se fose preciso), deberías poder instalar o certificado de Let's Encrypt. Isto desbotará o molesto aviso de seguridade que vimos con anterioridade.
Para ter instrucións máis detalladas, ou saber máis sobre certificados SSL/TLS, le a páxina correspondente aquí.
- desde a interface web
- desde a liña de ordes
Vai a Dominios > Preme no teu dominio > Certificado
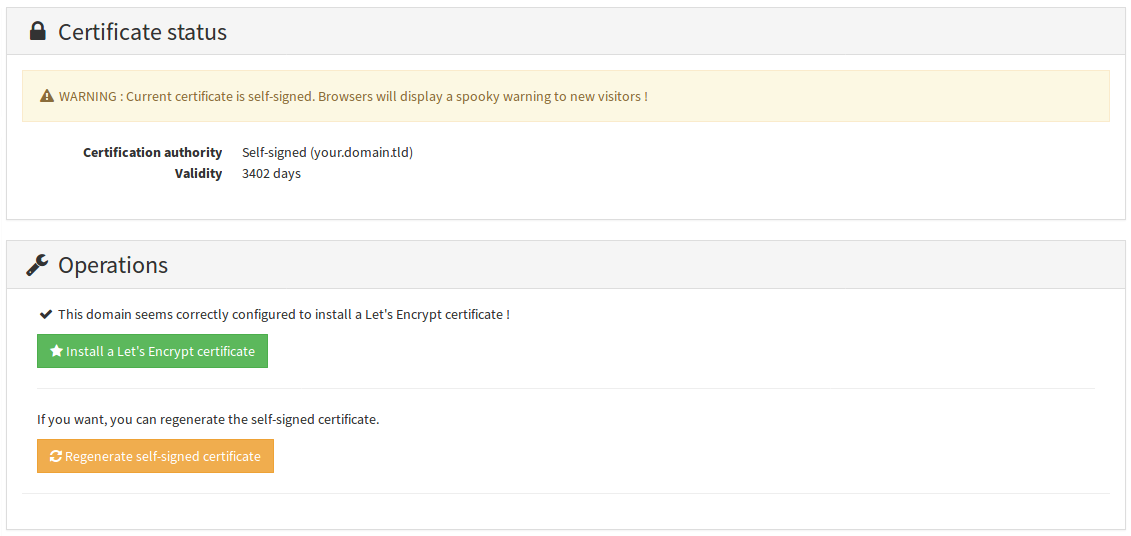
yunohost domain cert install
🎉 Parabéns!
Agora xa tes bastante ben configurado o servidor. Se nunca usaches YunoHost, recomendámosche botar un ollo a guía da interface web, desde onde poderás instalar as túas aplicacións preferidas. Non esquezas planificar as copias de apoio!