Sur un ordinateur classique
Pré-requis
- Un matériel compatible x86 dédié à YunoHost avec au moins 512 Mo de RAM et 16 Go d'espace disque
- il peut s'agir d'un ancien ordinateur portable, d'un ordinateur de bureau ou d'un serveur dédié
- Une clé USB d'au moins 1 Go.
- Un fournisseur d'accès Internet raisonnable, de préférence avec une bande passante ascendante bonne et illimitée.
- Un câble Ethernet (RJ-45) pour connecter votre serveur à votre routeur.
- Un ordinateur pour lire ce guide, flasher l'image et accéder à votre serveur.
Téléchargez l'image YunoHost
Si votre machine est en 32 bits, assurez-vous de télécharger l'image 32 bits.
(À CORRIGER : cette partie ne fonctionne pas actuellement...)
Vous pouvez également télécharger la clé publique du projet pour vérifier l'authenticité des images.
Flasher l'image YunoHost
Flashez l'image sur la clé USB ou gravez la sur un CD/DVD.
- Avec Etcher (recommandé)
- Avec USBimager
- Avec dd
- Utilisation de Ventoy
Téléchargez Etcher pour votre système d'exploitation, et installez-le.
Branchez votre clé USB, sélectionnez votre image et cliquez sur "Flash"

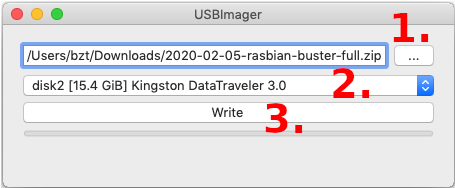
Téléchargez USBimager pour votre système d'exploitation et installez-le.
Branchez votre clé USB, sélectionnez votre image et cliquez sur "Écrire"
Si vous êtes sur GNU/Linux / macOS et que vous êtes à l'aise avec la ligne de commande, vous pouvez flasher votre clef USB ou carte SD avec la commande dd. Vous pouvez identifier le périphérique qui corresponds à votre clef USB ou carte SD avec fdisk -l ou lsblk. Typiquement, une carte SD a un nom comme /dev/mmcblk0. FAITES ATTENTION et assurez vous d'avoir le bon nom.
Puis lancez:
# Replace /dev/mmcblk0 if the name of your device is different...
dd if=/path/to/armbian.img of=/dev/mmcblk0 status=progress ; sync
Ventoy sera utile si vous ne parvenez pas à démarrer l'image YunoHost à l'aide des autres méthodes.
Ventoy est un outil pratique qui facilite grandement l'installation de plusieurs images Linux sur une clé USB. Lorsque l'ordinateur refuse de démarrer à partir d'une image sur une clé USB, Ventoy parvient généralement à le faire démarrer malgré tout !
- Installez Ventoy sur la clé USB. Reportez-vous aux instructions d'installation.
- Cela créera 2 partitions sur la clé.
- À l'aide de votre application d'exploration de fichiers préférée, copiez le fichier image YunoHost sur la grande partition
Ventoy(et non "VTOYEFI").
- N'utilisez pas Balena Etcher, USBImager ou
ddpour cela !
Plus tard, lorsque vous démarrerez l'ordinateur à l'aide de cette clé USB, Ventoy apparaîtra et affichera la liste des images présentes sur la clé USB. Sélectionnez l'image YunoHost, puis sélectionnez l'option de lancement GRUB2 (ou utilisez celle qui fonctionne pour votre ordinateur 😉).
Démarrez l'ordinateur à partir de votre clé USB
- Connectez votre ordinateur à votre routeur/box via Ethernet
- Démarrez votre ordinateur/serveur avec la clé USB ou le CD-ROM inséré, et sélectionnez-le comme périphérique de démarrage.
- En fonction de votre matériel, vous devrez appuyer sur l'une des touches suivantes :
<F9>,<F10>,<F11>,<F12>,<DEL>,<ESC>ou<Alt>. - N.B. : si l'ordinateur/serveur était précédemment installé avec une version récente de Windows (8+), vous devez d'abord demander à Windows de "redémarrer vraiment". Cela peut être fait quelque part dans les "Options de démarrage avancées".
- En fonction de votre matériel, vous devrez appuyer sur l'une des touches suivantes :
Si vous ne parvenez pas à démarrer l'image YunoHost, essayez d'utiliser Ventoy (sélectionnez "Ventoy" dans la section "Flasher l'image YunoHost" ci-dessus).
Lancer l'installation graphique
Vous devriez voir un écran comme celui-ci :
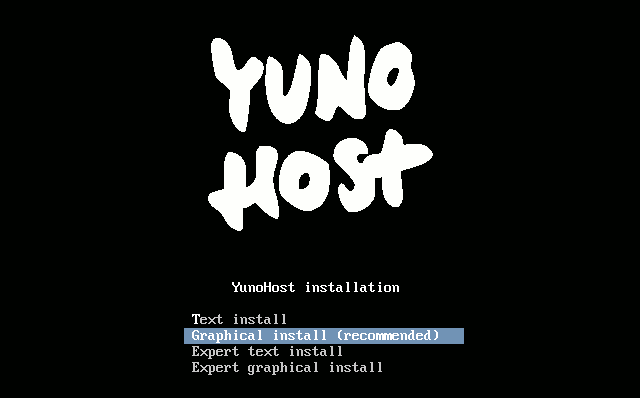
- Installation classique sur un disque entier
- Installation en mode expert
Une fois que vous aurez validé la disposition du clavier, l'installation sera lancée et effacera complètement les données présentes sur votre disque dur !
- Sélectionnez
Installation graphique. - Sélectionnez votre langue, votre emplacement géographique, la disposition de votre clavier et, éventuellement, votre fuseau horaire.
- Le programme d'installation téléchargera et installera ensuite tous les paquets requis.
Le projet YunoHost a simplifié autant que possible l'installation standard afin d'éviter que le plus grand nombre possible de personnes ne se perdent dans des questions trop techniques ou liées à des cas spécifiques.
Avec l'installation en mode expert, vous disposez de plus de possibilités, notamment en ce qui concerne le partitionnement précis de vos supports de stockage. Vous pouvez également choisir d'utiliser le mode classique et ajouter vos disques ultérieurement.
Résumé des étapes en mode expert
- Sélectionnez
Installation graphique avancée. - Sélectionnez votre langue, votre emplacement géographique, la disposition de votre clavier et éventuellement votre fuseau horaire.
- Partitionnez vos disques. C'est ici que vous pouvez configurer un RAID ou chiffrer tout ou partie du serveur.
- Spécifiez un éventuel proxy HTTP à utiliser pour l'installation des paquets.
- Spécifiez sur quels volumes grub doit être installé.
Concernant le partitionnement
En général, nous déconseillons de partitionner /var, /opt, /usr, /bin, /etc, /lib, /tmp et /root sur des partitions distinctes. Cela vous évitera d'avoir à vous soucier des partitions pleines qui pourraient planter votre machine, entraîner l'échec de l'installation d'applications ou même corrompre vos bases de données.
Pour des raisons de performances, il est recommandé de monter votre stockage le plus rapide (SSD) à la racine /.
Si vous disposez d'un ou plusieurs disques durs pour stocker des données, vous pouvez choisir de les monter dans l'un de ces dossiers en fonction de votre utilisation.
| Chemin | Contenu |
|---|---|
/home | Dossiers utilisateur accessibles via SFTP |
/home/yunohost.backup/archives | Sauvegardes YunoHost à placer idéalement ailleurs que sur les disques qui gèrent les données |
/home/yunohost.app | Données lourdes provenant des applications YunoHost (nextcloud, matrix, ...) |
/home/yunohost.multimedia | Données lourdes partagées entre plusieurs applications |
/var/mail | Courrier électronique des utilisateurs |
Si vous souhaitez bénéficier d'une certaine flexibilité et ne souhaitez pas (re)dimensionner les partitions, vous pouvez également choisir de monter sur /mnt/hdd et suivre ce tutoriel pour monter tous ces dossiers avec mount --bind.
À propos du chiffrement
Sachez que si vous chiffrez tout ou partie de vos disques, vous devrez saisir la phrase secrète à chaque redémarrage de votre serveur, ce qui peut poser problème si vous n'êtes pas sur place. Il existe toutefois des solutions (assez difficiles à mettre en œuvre) qui vous permettent de saisir la phrase secrète via SSH ou via une page web (recherchez "dropbear encrypted disk").
À propos du RAID
Gardez à l'esprit que :
- les disques de vos RAID doivent être de marques, d'usure ou de lots différents (en particulier s'il s'agit de SSD)
- un RAID 1 (même sans disque de secours) est plus fiable qu'un RAID 5 d'un point de vue probabiliste
- les RAID matériels dépendent de la carte RAID. Si la carte tombe en panne, vous aurez besoin d'une carte de remplacement pour lire et reconstruire la grappe
Si l'installateur YunoHost échoue et que vous ne parvenez pas à résoudre le problème, sachez qu'il est également possible d'installer Debian, puis d'installer YunoHost par-dessus. Consultez les instructions spécifiques.
Lancer la configuration initiale
Si vous êtes en train de restaurer une sauvegarde YunoHost, vous devez sauter cette étape et vous référer à la section Restaurer durant la post-installation à la place de cette étape de configuration initiale.
Cette documentation suppose que vous êtes sur le même réseau local que votre YunoHost.
Pour un VPS, utilisez l'adresse IP publique au lieu du domaine ou adresse locale.
- Depuis la webadmin
- Depuis la ligne de commande
Depuis un ordinateur, ouvrez un navigateur et tenter d'accéder à la webadmin:
- si vous installez sur un VPS, vous avez probablement utilisé la méthode d'installation basée sur
curl | bash, et le script aurait du vous pointer vers l'adresse, typiquementhttps://xx.xx.xx.xx(avec l'IPv4 publique du serveur) - si vous installez à la maison, et en supposant que vous êtes sur le même réseau local que le serveur
- vous pouvez tenter d'ouvrir https://yunohost.local (ceci peut ou peut ne pas fonctionner en fonction de si votre machine et réseau supporte le protocole Bonjour)
- si vous connaissez déjà l'IP locale du serveur, allez sur
https://xx.xx.xx.xx(avec l'IP locale, typiquement qui commence par192.168.) - autrement, il vous faut trouver l'IP locale du serveur pour continuer.
Lors de la première visite, vous rencontrerez très probablement un avertissement de sécurité lié au certificat utilisé. Pour le moment, votre serveur utilise un certificat auto-signé. Vous pourrez plus tard ajouter un certificat automatiquement reconnu par les navigateurs comme décrit dans la page sur les certificats. En attendant, ajoutez une exception de sécurité pour accepter le certificat actuel. (Toutefois, s'il vous plaît, ne prenez pas l'habitude d'accepter ce genre d'alerte de sécurité !)
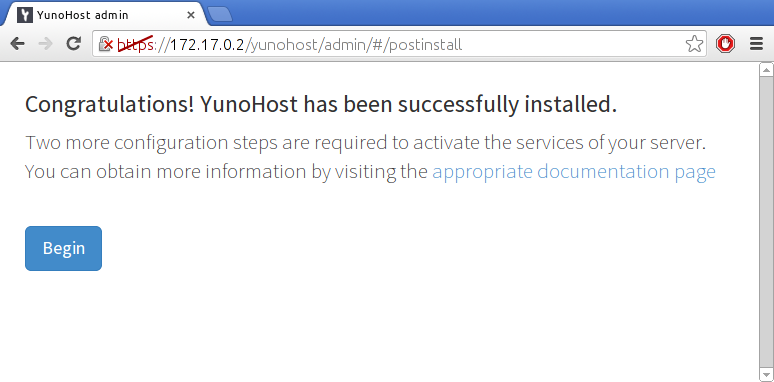
Vous devriez arriver sur cette page:
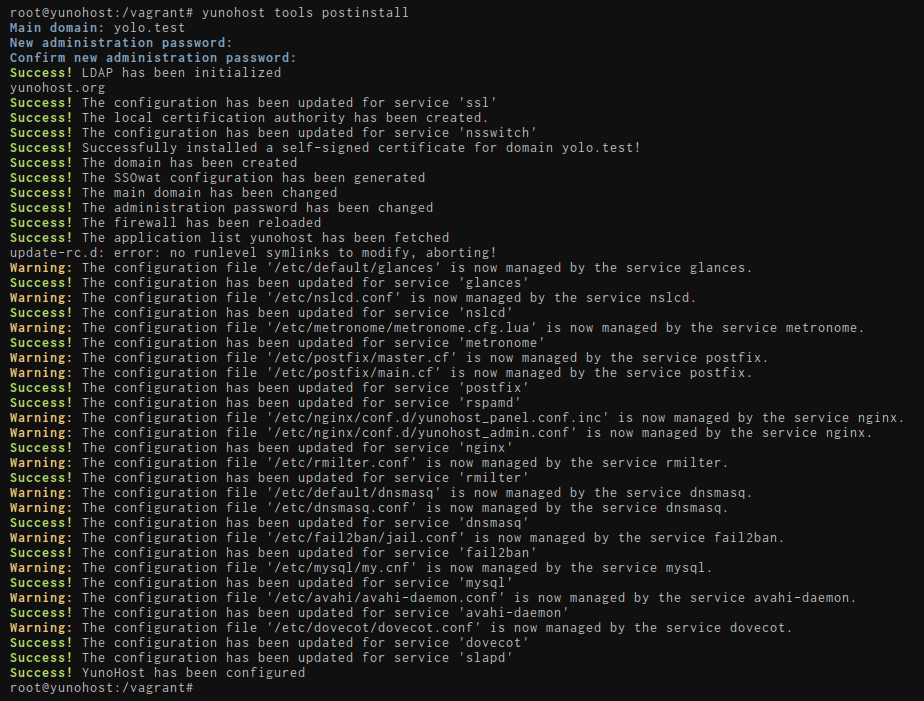
Vous pouvez aussi lancer la post-installation avec la commande yunohost tools postinstall directement sur le serveur ou via SSH.
Domaine principal
Configuration spécifique WSL
Vous devrez choisir un faux nom de domaine, car il ne sera pas accessible de l'extérieur.
Par exemple, ynh.wsl. L'étape compliqué est d'exposer ce nom de domaine à votre hôte.
Éditez le fichier C:\Windows\System32\drivers\etc\hosts. Vous devriez avoir une ligne commençant par ::1, créez la si elle n'existe pas, et rajoutez votre domaine à la fin:
::1 ynh.wsl localhost
Si vous voulez des sous-domaines, n'oubliez pas de les y rajouter auss dans le fichier hosts:
::1 ynh.wsl subdomain.ynh.wsl localhost
C’est le nom de domaine qui permettra l’accès à votre serveur ainsi qu’au portail d’authentification des utilisateurs. Vous pourrez ensuite ajouter d'autres domaines, et changer celui qui sera le domaine principal si besoin.
- Si l'auto-hébergement est tout nouveau pour vous, et que vous n'avez pas encore de nom de domaine, nous recommandons d'utiliser un domaine en .nohost.me / .noho.st / .ynh.fr (exemple :
homersimpson.nohost.me). S'il n'est pas déjà utilisé, le domaine sera automatiquement rattaché à votre serveur, et vous n’aurez pas d’étape de configuration supplémentaire. Toutefois, notez que l'utilisation d'un de ces noms de domaines implique que vous n'aurez pas le contrôle complet sur votre configuration DNS. - Si vous disposez déjà d'un nom de domaine, alors vous voulez probablement l'utiliser ici. Il vous faudra plus tard configurer les enregistrements DNS comme expliqué ici.
Oui, vous devez configurer un nom de domaine. Si vous n'avez pas de nom de domaine et que vous n'en voulez pas en .nohost.me, .noho.st ou .ynh.fr, vous pouvez utilisez un « faux » domaine comme par exemple yolo.test et modifier votre fichier /etc/hosts sur votre ordinateur local pour que ce domaine pointe vers l'IP de votre serveur, comme expliqué ici.
Premier compte utilisateur⋅ice
Le premier compte utilisateur est créé à cette étape. Il vous faudra choisir un nom d'utilisateur et un mot de passe raisonnablement complexe. (Nous ne pouvons que souligner l'importance du choix d'un mot de passe robuste !) Ce compte utilisateur sera ajouté au groupe Admins, et pourra se connecter au portail utilisateur, à la webadmin, et se connecter via SSH ou SFTP. Les admins recevront aussi les mails envoyés à root@votredomaine.tld et admin@votredomaine.tld : ces emails peuvent être utilisés pour envoyer des informations ou des alertes techniques. Vous pourrez plus tard ajouter d'autres comptes supplémentaires, qu'il est aussi possible d'ajouter au groupe Admins.
Ce compte remplace l'ancien compte admin, qui est peut être toujours mentionné dans certaines pages de documentation. Dans ce cas, remplacez simplement admin par votre identifiant.
Lancer le diagnostic
Une fois la postinstall terminée, vous devriez pouvoir vous connecter à la webadmin en utilisant les identiants du premier compte que vous venez de créer.
Le système de diagnostic est conçu comme un moyen facile de valider que tous les aspects critiques de votre serveur sont proprement configurés et pour vous guider dans la résolution des problèmes soulevés. Le diagnostic se lance deux fois par jour et envoie une alerte par email si un dysfonctionnement est détecté.
Ne partez pas en courant ! La première fois que vous lancerez le diagnostic, il est assez normal d'avoir plusieurs alertes rouges ou jaunes car vous devez généralement configurer les enregistrements DNS (si vous n'utilisez pas un domaine .nohost.me, .noho.st ou .ynh.fr), ajouter un fichier de swap ainsi que configurer la redirection des ports sur votre box.
Si une alerte n'est pas pertinente (par exemple parce que vous ne pensez pas utiliser une fonctionnalité spécifique), il est tout à fait convenable d'indiquer le dysfonctionnement comme « À ignorer » en allant dans l'administration web > Diagnostic, et en cliquant sur le bouton « Ignorer » pour ce dysfonctionnement spécifique.
Notamment, les installations WSL ou sur machines virtuelles ne seront généralement pas accessibles de l'extérieur sans une configuration réseau avancée sur Virtualbox et son hôte.
- (Recommandé) Depuis l'interface web
- Depuis la ligne de commande
Pour lancer le diagnostic, allez dans la webadmin, dans la partie Diagnostic. Vous devriez obtenir un écran comme celui-ci :

yunohost diagnosis run
yunohost diagnosis show --issues --human-readable
Obtenir un certificat Let's Encrypt
Une fois que vous avez configuré, si nécessaire, les enregistrements DNS et la redirection de ports, vous devriez être en mesure d'installer un certificat Let's Encrypt. Ceci permettra de supprimer l'effrayante alerte de sécurité vue plus tôt.
Pour plus d'instructions détaillées, ou pour en savoir plus à propos des certificats SSL/TLS, voir la page correspondante ici.
- Depuis la webadmin
- Depuis la ligne de commande
Allez dans Domaines > le domaine concerné > Certificat
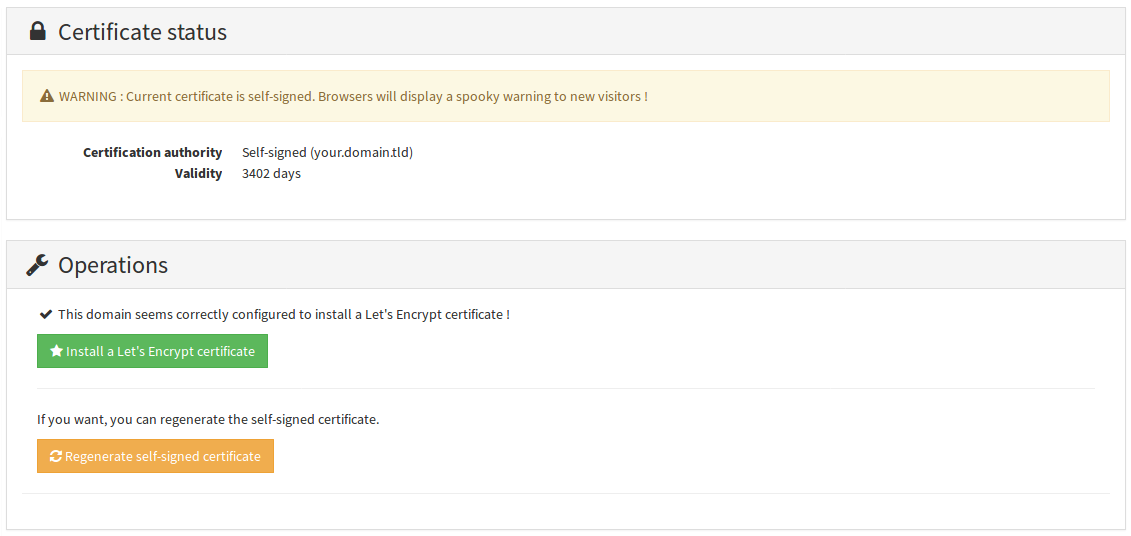
yunohost domain cert install
🎉 Félicitations !
Vous avez maintenant un serveur plutôt bien configuré. Si vous découvrez YunoHost, nous vous recommandons de jeter un œil à la visite guidée. Vous devriez aussi être en mesure d'installer vos applications favorites. N'oubliez pas de prévoir des sauvegardes !